Mastering the Paper Beige Cards Mockup for Professional Greeting Designs
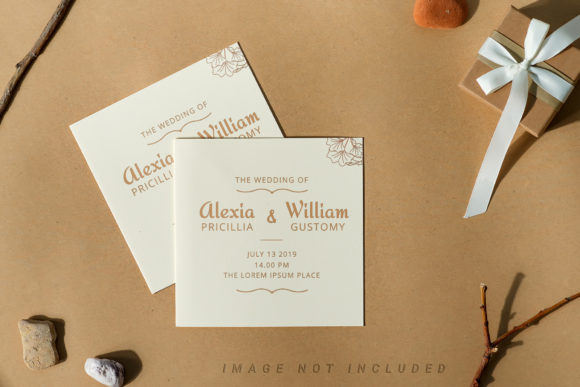
If you are looking to elevate your greeting card designs without spending a fortune on professional photography, the Paper Beige Cards Mockup offers a practical solution. This tool is designed specifically for creators who need to present their work in a realistic setting. It features a top-down view of two mock-up paper postcards, beautifully decorated with ribbons and dried plants against a soft pastel beige background. The composition includes natural shadows and ample copy space, making it an ideal canvas for congratulation cards or personal messages.
However, simply downloading a file does not guarantee a perfect result. Many designers, from beginners to seasoned professionals, make critical errors when applying their artwork to smart objects. These mistakes can ruin the realism of the presentation, making a high-quality design look cheap or unprofessional. Understanding the specific mechanics of this mockup is essential before you start working.
Understanding the Smart Object Workflow
The core feature of this mockup is the active smart object layer. When you open the file, you will see a placeholder where your design should go. The instructions state that you simply paste your design into this smart object and save it. While this sounds straightforward, the process requires attention to detail. If you do not respect the boundaries of the smart object, your text or images may get cut off or appear distorted when viewed in the final composition.
A common misunderstanding involves the assumption that the background color or the lighting can be changed easily. It is important to remember that this is a photo, not a 3D render or a vector illustration. The background or design color does not change automatically based on your input. The lighting, shadows, and texture of the paper are baked into the image. Your design must adapt to these existing conditions. If your typography or graphics clash with the warm beige tones or the shadowed areas, the final result will lack cohesion.
The Critical Role of the Safety Zone
One of the most overlooked details in this workflow is the safety zone. Each file includes a safety zone for the smart object inside, which is designed to make placing objects more convenient. These are lines of an object that are not included in the final smart output. To activate this layer and see them, you must manually turn on the specific layer in your software.
Failing to check the safety zone is a frequent mistake that leads to poor results. If your design extends beyond these lines, parts of your content might be cropped out or hidden behind the folds of the paper in the mockup. This is particularly dangerous for text-heavy congratulation cards where every word counts. A message that looks perfect in your editing software might have crucial information missing in the final presentation because it fell outside the safe area.
- Always activate the safety zone layer before finalizing your design placement.
- Keep all critical text and logos well within the marked boundaries.
- Test your design by saving the smart object and checking how it aligns with the paper edges.
Common Pitfalls in Design Application
When using the Paper Beige Cards Mockup, users often overlook the importance of resolution and file size. The mockup itself is high quality at 6016×4016 pixels with a resolution of 300 DPI. This means it is suitable for large prints and high-resolution web displays. However, if you upload a low-resolution image into the smart object, the final mockup will look pixelated, regardless of the high quality of the base file. Always ensure your source design matches the resolution requirements of the mockup to maintain professional standards.
Another significant error involves the expectation of flexibility regarding the scene elements. The description notes that the mockup includes dried plants and ribbons. Some users try to mask or remove these elements to create a cleaner look. This is generally not recommended unless you have advanced Photoshop skills. Removing these decorative elements can leave visible artifacts or unnatural gaps that destroy the photorealistic feel. Instead, focus on designing your content so that it complements the dried plants and ribbon rather than competing with them.
Typography is also a major consideration. The documentation explicitly states that applied typography is NOT INCLUDED. This means you must bring your own fonts. A common mistake is using generic or overly complex fonts that do not fit the elegant, rustic aesthetic of the beige background. The design should harmonize with the pastel tones. If your font is too bold or has harsh contrasts, it will stand out unnaturally against the soft shadows. Choose typography that enhances the message without overpowering the visual balance of the card.
Evaluating Before You Buy or Download
Before deciding to use this specific mockup, there are several factors you should evaluate. First, consider your target audience. Are you creating congratulation cards for weddings, birthdays, or corporate events? The pastel beige theme with dried plants suggests a warm, organic, and perhaps slightly vintage style. If your brand identity is modern and industrial, this mockup might not align with your visual language.
Secondly, verify the technical specifications. Ensure that your current software supports smart objects and that you are comfortable navigating layers. The file format is .psd, which is standard for Photoshop users. If you are working in other applications, you may need to convert your workflow or find a compatible alternative. The inclusion of documentation is helpful, but having a basic understanding of layer management is necessary to utilize the safety zone effectively.
Finally, think about the end use. Will this mockup be used for social media, a portfolio, or client presentations? The 300 DPI resolution makes it versatile for print, but the static nature of the photo means it cannot be rotated or viewed from different angles like a 3D model. If you need dynamic views, this is not the right tool. However, for a clean, top-down presentation of your design, it excels.
Best Practices for a Polished Result
To avoid the pitfalls mentioned above, adopt a methodical approach. Start by opening the .psd file and locating the safety zone layer. Activate it immediately to visualize your boundaries. Next, prepare your design in a separate document with the correct dimensions and resolution. Paste it into the smart object, ensuring that no vital elements touch the edges. Save the smart object, then review the main composition.
Check the contrast between your text and the beige background. If the text is hard to read due to the shadows, adjust the opacity or add a subtle drop shadow to your text layer within the smart object. This ensures legibility without altering the physical properties of the mockup. Remember, the goal is to make your design look like it belongs naturally in the scene.
By respecting the limitations of the photo-based mockup and utilizing the safety zones correctly, you can produce stunning presentations. The Paper Beige Cards Mockup is a powerful asset for anyone needing to showcase greeting card designs. It provides a realistic context that helps clients and customers visualize the final product. With careful preparation and attention to detail, you can avoid common errors and deliver high-quality results that satisfy both your creative vision and your audience's expectations.
Take the time to understand the features, such as the active smart object and the safety zone, before diving in. This small investment of time will save you from frustrating revisions and ensure that your work stands out. Whether you are a freelancer pitching to a new client or a small business owner launching a holiday collection, using this mockup correctly can significantly enhance your professional image.